I have just uploaded all my Photoshop Elements 8-10 beginner videos onto YouTube for anybody who wants a quick crash course on how to use it.
If you want to be able to do the changes that I did to my prints in the previous post then watch videos five and eight.
Also, these 3 pdf files are a good beginners aid. I use the shortcut keys a lot in the videos:
Happy viewing!

Sunday, 7 July 2013


Tuesday, 2 July 2013
Getting on the Gelli Plate Bandwagon
I bought myself a gelli plate last year in the US because you couldn't get them here in the UK at the time. It has been sitting in my cupboard, waiting to be used. Suddenly, it seems that everybody is using them, teaching with them, painting with them - they've gone viral!
So, I thought, okay time to see what this gelli plate malarkey is all about.
Went out and got myself some vegetation and put together some mark making tools.
It wasn't as easy as it looks! It needs a bit of practise and organisation. Here are a couple of things that I learnt from my first run:

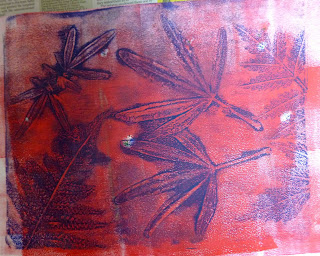


 The second and fifth are ghost prints and on the fifth you can see the white scratch marks caused by trying to get the paper stencil off the plate.
Ah, but the big thing for me is using them in Photoshop Elements. I took a picture of the leaves that I had used because they looked so pretty:
 And then I blended this photo with the third and sixth prints to get these manipulations (also changed the levels and colours). Some of them would probably look better in portrait:


So, I thought, okay time to see what this gelli plate malarkey is all about.
Went out and got myself some vegetation and put together some mark making tools.
It wasn't as easy as it looks! It needs a bit of practise and organisation. Here are a couple of things that I learnt from my first run:
- Don't use copier paper. It buckles and there is nothing more soul destroying (particularly with this craft) than getting a decent print on a lousy piece of paper. It also tends to stick to the plate if the paint has dried a bit. Instead I used a 50 sheet pad of cartridge 120gsm and it worked nicely.
- Expect that there is only going to be 1 good print for every 5 bad although I hope with practice this will improve!
- When you clean your plate, do the final dry with a fabric cloth/towel. The first time, I patted a paper towel on it for the final dry and took the next 10 minutes trying to scrap it off!
- Don't use paper stencils. Again, horrible to get off the gel plate and in the meantime the paint has dried so you don't get a ghost print. Also, fatally I used a paper stencil with a previous layer that was wet and couldn't get it off my original - gutted. I had some acetate stencils that I made some while back and they worked great.
- I found that a smaller brayer worked better than a big one but might just be me.
- I tended to clean the plate inbetween prints because otherwise the previous layer sometimes dried and you don't get crisp mark making.


Ah, but the big thing for me is using them in Photoshop Elements. I took a picture of the leaves that I had used because they looked so pretty:


Tuesday, 25 June 2013
Lino Cutting
I had such a fun day today. I went to visit my photographer friend, Kayla Stoate, who does the most amazing portraits. She has recently purchased a printing press and we both wanted to have a go at doing a lino cut.
We struggled a bit with the press but I think with a bit of practice it will work well. This is a print I got from the pheasant that I did. It wasn't as accurate as the picture - probably took on more than I could chew - but not bad for my first attempt.

I had converted the original photo to a black and white copy using the Pen and Ink filter in Photoshop Elements 11 and made the mistake of not taking a copy of the original photo to compare back to. I transferred the laser copy to the lino using a matt medium which worked pretty well - again something that I could do better next time.
It's never as easy as it looks!
We struggled a bit with the press but I think with a bit of practice it will work well. This is a print I got from the pheasant that I did. It wasn't as accurate as the picture - probably took on more than I could chew - but not bad for my first attempt.

I had converted the original photo to a black and white copy using the Pen and Ink filter in Photoshop Elements 11 and made the mistake of not taking a copy of the original photo to compare back to. I transferred the laser copy to the lino using a matt medium which worked pretty well - again something that I could do better next time.
It's never as easy as it looks!
Sunday, 23 June 2013
Swannery in Dorset
I have been meaning to post some of the pictures I took at the Swannery in Abbotsbury, Dorset. It was just a fantastic day.


Thursday, 13 June 2013
Nearly a disaster
I went on a canvas stretching course this week at DIYFraming and as part of the course we had to bring two items to stretch which could be canvas or fabric. I decided that I wanted to bring one of each so that I could get a feel for stretching both. One of the canvasses was to have a thick frame and the other was to have a thin frame but be mounted in what is called a tray which is what I was really interested in.
So I set about making a quick fabric picture to stretch on a frame and came up with a sunbird based on a photo that I had. I printed all the fabric on my computer and once I had stuck the applique pieces on with fusible web, I drew lines with a vanishing ink pen to help me with the thread lines that I was going to sew. At the end I decided that I would add some butterflies on the background in the same thread as the background just so that there would be a faint thread butterfly outline on the background. I did this two days before it needed to be finished and was alarmed the day before the course when I realised that not all the lines from the vanishing ink pen were disappearing. Where I had pressed a little harder the ink was not disappearing!

It looked terrible - these 3 drawn butterflies on the background spoilt the piece completely. So at 9.00pm on the night before the course, I set about replacing the background (I had already added a border). I reprinted a background with text, drew a pattern of where the background should be using a lightbox, applied fusible web and cut out the background. I stuck it in place and proceeded to sew around the edges. 10.30pm I was finished and it looked okay. Phew!
So here is the end result, stretched onto a frame. Although it wasn't perfect, in the end I thought it was better because the original background had looked too busy. It was a fun piece but not spectacular.

Here is the other picture I framed which is a photo taken by my husband that I manipulated. I love this piece and as you can see it goes well with the sofas in our lounge. These tray frames really make a canvas look professional and I'm chuffed that I am now able to do them myself:

So I set about making a quick fabric picture to stretch on a frame and came up with a sunbird based on a photo that I had. I printed all the fabric on my computer and once I had stuck the applique pieces on with fusible web, I drew lines with a vanishing ink pen to help me with the thread lines that I was going to sew. At the end I decided that I would add some butterflies on the background in the same thread as the background just so that there would be a faint thread butterfly outline on the background. I did this two days before it needed to be finished and was alarmed the day before the course when I realised that not all the lines from the vanishing ink pen were disappearing. Where I had pressed a little harder the ink was not disappearing!

It looked terrible - these 3 drawn butterflies on the background spoilt the piece completely. So at 9.00pm on the night before the course, I set about replacing the background (I had already added a border). I reprinted a background with text, drew a pattern of where the background should be using a lightbox, applied fusible web and cut out the background. I stuck it in place and proceeded to sew around the edges. 10.30pm I was finished and it looked okay. Phew!
So here is the end result, stretched onto a frame. Although it wasn't perfect, in the end I thought it was better because the original background had looked too busy. It was a fun piece but not spectacular.

Here is the other picture I framed which is a photo taken by my husband that I manipulated. I love this piece and as you can see it goes well with the sofas in our lounge. These tray frames really make a canvas look professional and I'm chuffed that I am now able to do them myself:

Sunday, 2 June 2013
Silver Bullet Cutting Machine
I recently bought myself a new cutting machine and have been creating vector files to work with it.
For those of you who don't know much about digital files, the files you take on a digital camera are bitmap files usually in the jpeg format but there are others. Another type of file is a .svg which stands for scalable vector graphics file which is made up of mathematical points. If you have a look at this file it is has an xml format and the reason why it is called scalable is because it doesn't matter how big or small you make the picture it doesn't lose it's definition unlike a bitmap file which if you magnify it becomes a series of squares. A cutting machine is able to use the mathematical points in the file to cut the shape or picture.
Here is the picture I took of a cheetah at a sanctuary in South Africa and next is the .svg file. So the cheetah would be cut out of white paper and to show it I have put it on a black background.
 The photo had the cheetah's tail cropped off so I had to guess and looking at it now I think I have probably made it too short so will have to lengthen it. Interestingly the end of a cheetah's tail is striped rather than dotted which I ascertained from other photos I have.

For those of you who don't know much about digital files, the files you take on a digital camera are bitmap files usually in the jpeg format but there are others. Another type of file is a .svg which stands for scalable vector graphics file which is made up of mathematical points. If you have a look at this file it is has an xml format and the reason why it is called scalable is because it doesn't matter how big or small you make the picture it doesn't lose it's definition unlike a bitmap file which if you magnify it becomes a series of squares. A cutting machine is able to use the mathematical points in the file to cut the shape or picture.
Here is the picture I took of a cheetah at a sanctuary in South Africa and next is the .svg file. So the cheetah would be cut out of white paper and to show it I have put it on a black background.


Subscribe to:
Posts (Atom)