

Thursday, 16 January 2014
Sausage Dog
It's been a while since I posted any of my photo manipulation. Here is a pic of a friend's dog that I did for her recently:
Sunday, 5 January 2014
Owl Handbag
I think it must be every lady's quest in life to find the ultimate handbag. I find leather handbags too heavy so I have been meaning for many years to make myself the all time handbag but I can never find the right material that suits all my colour needs.
Lately, I have been in search of this elusive fabric and it has often struck me that the best fabrics are used for cushions. I often see a cushion and think, hey, that would make a great handbag. Well, this weekend I found this gorgeous owl cushion and I thought - YES, I'm going to make a handbag of that. I had an old pair of pinstripe trousers that had become threadbare in places and I kept it for 8 years (!) with the intention of making a bag with it sometime. I realised that I could use it for lining, pockets and a strap. So inside the Owl I added lining with a zip pocket and two open pockets for my Sony walkman and phone and added a zip at the top. So here it is:
 I absolutely love it. I can see myself using it to death. I love the size and there are lots of colours to go with all my winter clothes. It's a bit funky but I love having something different.
Think I am in search of another cushion to make a summer bag now!
Lately, I have been in search of this elusive fabric and it has often struck me that the best fabrics are used for cushions. I often see a cushion and think, hey, that would make a great handbag. Well, this weekend I found this gorgeous owl cushion and I thought - YES, I'm going to make a handbag of that. I had an old pair of pinstripe trousers that had become threadbare in places and I kept it for 8 years (!) with the intention of making a bag with it sometime. I realised that I could use it for lining, pockets and a strap. So inside the Owl I added lining with a zip pocket and two open pockets for my Sony walkman and phone and added a zip at the top. So here it is:

Think I am in search of another cushion to make a summer bag now!
Sunday, 22 December 2013
Confessions of a New Christmas Crafter
I can't believe it has been so long since I lasted blogged. My husband has been transferred to Hong Kong and we are moving there early next year so the last couple of months have been hectic with a trip to Hong Kong and days of serious dejunking and sorting out. I don't often say Christmas is going to be the relaxing part of this year! Just the two of us, packing and watching tv and videos - excellent!
I don't usually do anything fancy for Christmas but every Christmas Eve my husband and I go to a friends' place for dinner (we are the same 4 couples each year) and the host gives us all a lovely little present wrapped with ribbons and all sorts and she's not even a crafter! I just felt that this year I needed to make more of an effort and there are so many lovely gift wrapping ideas on Pinterest that it is very inspiring.
So while surfing, I found two tutorials which would totally suit what I wanted to do. The first was a tutorial to make a flower found at http://artfulaffirmations.blogspot.co.uk/p/free-video-tutorials.html and the second was a pillow box found at http://www.birdscards.com/free-digital-cut-files/boxes-bags/.
So I went out and bought some red crepe paper, some red cardboard, some gold balls on a string (for the flower hearts), some gold glitter and some gold embossing powders.
I sat down today and thought 'do I really want to do this (sigh). Maybe I should have just bought some pretty ribbon.' Anyhow, too often I have gone out and bought stuff and never made what I intended to make and still I find stuff and think 'hey, what did I buy that for?' - SOUND FAMILIAR??!
Also, do you sometimes wonder if it will be as good as what you have in your head??
So here goes.. Firstly, the red cardboard was really boring and the challenge was to make it Christmassy. I tried embossing it in my Big Shot but it just didn't feel right. Then I got one of my stamping patterns and tried it with the gold embossing powder and thought 'yeah, this is the way to go' so here was my starting kit together with glue:

I went through the flower tutorial (see link above) but because I didn't have any round cutters I raided my foreign coin stash and found a 20 piece from Australia and a 50 cents piece from Hong Kong which fit the bill nicely! I drew around these on the crepe paper and cut them out.
The Flower: one thing was clear from the start - the crepe paper I bought wasn't great quality and I decided to make each petal double. Also, lots of glue just made the crepe paper disintegrate so I used it very sparingly not like the video! My crepe paper also didn't stretch as much and I was a bit apprehensive about how the flowers would turn out in the end. I made a couple more petals just in case but in the end they weren't needed.
I wondered at this point whether it was all going to be worth it but once I had put the whole flower together I was surprisingly pleased. Hmmm, not so bad after all.
Now the box: I took the svg pattern into Inkscape and changed the size to suit the size of my gifts, printing it out a couple of times to get the size right. I cut out the shape on paper first and used it as a template to cut out the cardboard. I scored the lines using a steel ruler and quite fortuitously a cd worked well to make the circular score lines for the openings:
 Once I had cut out the cardboard and bent along the score lines I then inked up the pattern stamp with the Versamark inkpad, stamped it, covered it with the gold embossing powders and then used a heatgun to finish off the embossing.
Here is the end result and I am mightily pleased. Was it worth it?? Heck, yes.

I don't usually do anything fancy for Christmas but every Christmas Eve my husband and I go to a friends' place for dinner (we are the same 4 couples each year) and the host gives us all a lovely little present wrapped with ribbons and all sorts and she's not even a crafter! I just felt that this year I needed to make more of an effort and there are so many lovely gift wrapping ideas on Pinterest that it is very inspiring.
So while surfing, I found two tutorials which would totally suit what I wanted to do. The first was a tutorial to make a flower found at http://artfulaffirmations.blogspot.co.uk/p/free-video-tutorials.html and the second was a pillow box found at http://www.birdscards.com/free-digital-cut-files/boxes-bags/.
So I went out and bought some red crepe paper, some red cardboard, some gold balls on a string (for the flower hearts), some gold glitter and some gold embossing powders.
I sat down today and thought 'do I really want to do this (sigh). Maybe I should have just bought some pretty ribbon.' Anyhow, too often I have gone out and bought stuff and never made what I intended to make and still I find stuff and think 'hey, what did I buy that for?' - SOUND FAMILIAR??!
Also, do you sometimes wonder if it will be as good as what you have in your head??
So here goes.. Firstly, the red cardboard was really boring and the challenge was to make it Christmassy. I tried embossing it in my Big Shot but it just didn't feel right. Then I got one of my stamping patterns and tried it with the gold embossing powder and thought 'yeah, this is the way to go' so here was my starting kit together with glue:

I went through the flower tutorial (see link above) but because I didn't have any round cutters I raided my foreign coin stash and found a 20 piece from Australia and a 50 cents piece from Hong Kong which fit the bill nicely! I drew around these on the crepe paper and cut them out.
The Flower: one thing was clear from the start - the crepe paper I bought wasn't great quality and I decided to make each petal double. Also, lots of glue just made the crepe paper disintegrate so I used it very sparingly not like the video! My crepe paper also didn't stretch as much and I was a bit apprehensive about how the flowers would turn out in the end. I made a couple more petals just in case but in the end they weren't needed.
I wondered at this point whether it was all going to be worth it but once I had put the whole flower together I was surprisingly pleased. Hmmm, not so bad after all.
Now the box: I took the svg pattern into Inkscape and changed the size to suit the size of my gifts, printing it out a couple of times to get the size right. I cut out the shape on paper first and used it as a template to cut out the cardboard. I scored the lines using a steel ruler and quite fortuitously a cd worked well to make the circular score lines for the openings:

Here is the end result and I am mightily pleased. Was it worth it?? Heck, yes.

Monday, 30 September 2013
Digital Stamps
Wow, sorry, it's been ages since I last blogged and although I haven't done much in the way of art/craft lately, hundreds of ideas have been milling around my head.
The last time I made my own Christmas cards was a couple of years back and it was a great photo of our back garden with a snowman. I felt this year that I would like to get into some serious card making so I have been looking on pinterest and checking out all the wonderful cards on the internet to get inspiration and the cards I like the most are the stamped, vintage looking cards.
So last week I went to a big stamp and card making show and was just shocked at the price of everything. You know, I do love Tim Holtz's distress ink pads but then it's the sprays and the pens and goodness knows what else and I think is it all necessary!!? Then there's the nesties and the stamps and the accessories. Just for a couple of cards, you have to buy a whole shop!
So I decided that I am going to create my own 'digital stamps' and my own background papers. So as a test I got one of my flower pictures and proceeded to make a birthday card. I love it! I wondered whether it would take any of the 'arty-craftiness' out of card making but it required just as much skill to get the mix right, choose the colours and make up the card. Christmas cards here I come!
This is my original picture:

This is the card I created. I printed onto some pearlised paper that you can use in your inkjet printing and it gives it a lovely sheen:

Think I might try some black outlines next and colour them in and see how that goes.
Wednesday, 14 August 2013
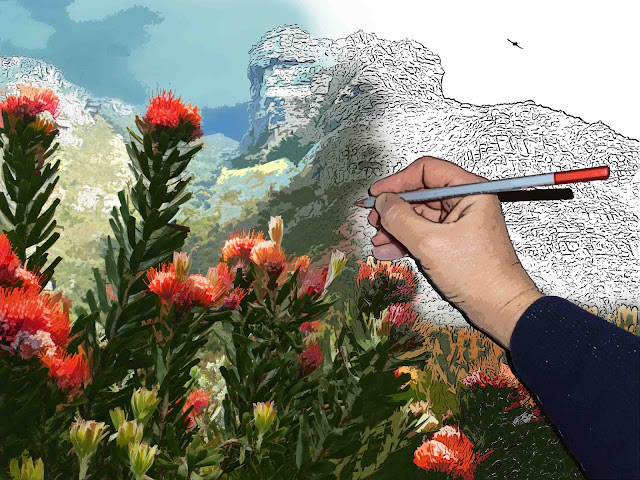
Am I painting this??
I spent yesterday experimenting with PSE. I wanted to create one of those weird pictures where reality and picture are mixed up together. I wanted to give the illusion that I was actually painting the picture so I took a picture of my hand and added it to the picture and converted some of the picture to black and white. I didn't actually want the hand to look too real - I wanted it to look part of the picture - so I added a black outline and used the cut out filter to make it a bit blocky.

Friday, 2 August 2013
Flowers for Photo Art Friday
I haven't taken part in Photo Art Friday for a while but when I saw it was flowers, I thought I just had to submit a picture as my hubby had taken some great pictures of the flowers in our garden.
So here is my submission:
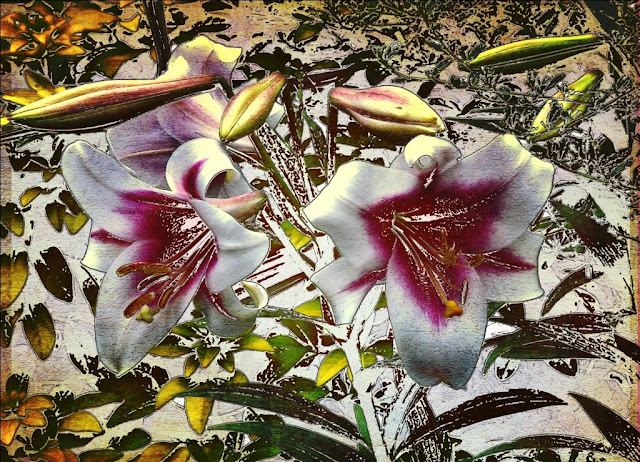
And here is how I did it.

So here is my submission:

And here is how I did it.

- I copied the background layer (ctrl+j for PC or cmd+j for Mac)
- I then set the foreground colour to #c1a567 and the background to white.
- With the copy selected, I went to the filter gallery and choose the Stamp under Sketch and changed the Light/Dark balance so that most of the flower and leaves were beige.
- I then changed the blending mode of this layer to Pin Light and set the opacity to 83%.
- Pen and ink layer: I made another copy of the background and went to Filter>Sketch>Pen and Ink. I put the detail up to 1 with a little width and contrast and put the fill down to zero so that it was just a black outline on white.
- I then went to the magic wand tool selected a white area and deleted the white. I set the opacity of this layer to 60%.
- I brought in the free texture, Sky Love, from Pixel Dust Photo Art and set the blending mode to Color Burn and the opacity to 72%. I put this layer just below the pen and ink layer.
- Finally I added a levels adjustment layer and lightened the whole image a little.
Subscribe to:
Posts (Atom)